How to Create a Custom Program
Icon for a Console Mode Application
by Curtis Krauskopf
Q: How can I specify a  custom
program icon in a console-mode application? The default
C++ Builder icon is always used whenever I build a console-mode
application. The "Load Icon" button on the
Application tab in the project options panel is grayed
out so I can't set it there. custom
program icon in a console-mode application? The default
C++ Builder icon is always used whenever I build a console-mode
application. The "Load Icon" button on the
Application tab in the project options panel is grayed
out so I can't set it there.
A: To change the icon for a console-mode
application, load its resource file into the image editor,
make the changes and then save the new resource file.
The new icon will be incorporated into the executable
after the resource file has been re-added to the project
or the Borland C++ Builder IDE has been restarted.
Here are some step-by-step instructions:
The Console-Mode Application
Let's say your console-mode application is called ConsoleApp
and it's located in c:\cpp\ConsoleApp,
like this
: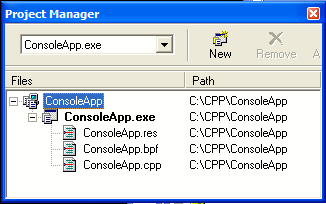
By default, the resource file is located
in the same directory as your console-mode application.
In the above example, the resource file we need to open
is called c:\cpp\ConsoleApp\ConsoleApp.res.
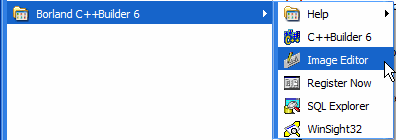
Launch the Image Editor
Find the Image Editor in the Borland C++ Builder 6
program menu:
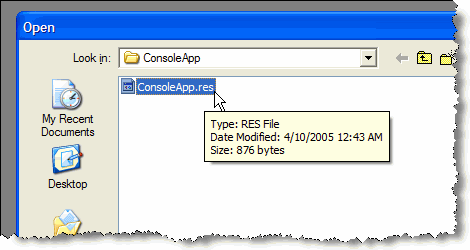
Open the Console-Mode Application
Resource File
In the Image Editor, select
and
and then navigate to the .res
file for your console-mode application. In the below
example, the project is named ConsoleApp
and so the resource file name is ConsoleApp.res.
Open the Icon
In a default console-mode application resource file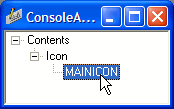 ,
the icon embedded in the resource file is called MAINICON.
To open the MAINICON icon,
expand the Icon tree branch and double-click on MAINICON. ,
the icon embedded in the resource file is called MAINICON.
To open the MAINICON icon,
expand the Icon tree branch and double-click on MAINICON.
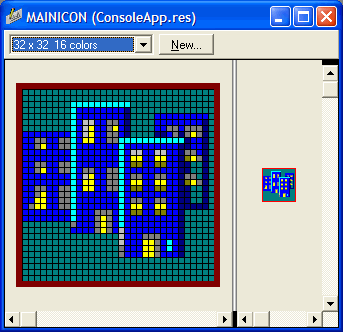
That will open the icon editing window in the Image
Editor. The icon editing window has two parts: a pixel
editor in the left panel and a full-size icon in the
right-hand panel. The icon itself is a 32x32 bit, 16
color icon.
When you're done modifying the icon and customizing
it, you'll notice on the
menu that the and menu choices are greyed-out. In order to save
the icon, you need to click on the ConsoleApp.res resource
window (the one with the Contents | Icon | MAINICON
tree). Then you'll be able to
the icon (and the resource file).
Seeing Your Icon
If you go back to C++ Builder and then
and execute your application, you'll be disappointed to
see the old icon. Even if you force the application
to , you'll still see
the old icon! The reason for this is because the linker
apparently caches the .res file. In order for C++ Builder
to recognize the new .res file, you need to remove it
from the project and then add it back again. Then you
will be able to build or make a console-mode application
with your custom icon.
execute your application, you'll be disappointed to
see the old icon. Even if you force the application
to , you'll still see
the old icon! The reason for this is because the linker
apparently caches the .res file. In order for C++ Builder
to recognize the new .res file, you need to remove it
from the project and then add it back again. Then you
will be able to build or make a console-mode application
with your custom icon.
Creating 16-Bit Icons
Many parts of Windows use 16x16 bit icons (called a
16-bit icon) to display application icons and other
parts of Windows use 32x32 bit (called 32-bit) icons.
If the only icon available is a 32-bit icon, Windows
will try to use it when a 16-bit icon is required. Sometimes
the 32-bit icon doesn't render very well when it's being
used in a 16-bit icon situation. Likewise, if the resource
file only defines a 16-bit icon, it can have a 'jagged'
look when it's rendered as a 32-bit icon.
 On
the Icon Editing Window In the Image Editor, click on
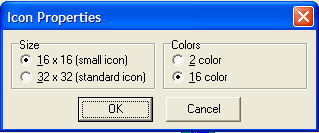
the New button to add a 16-bit icon to the 32-bit icon.
The Icon Properties window will appear. On
the Icon Editing Window In the Image Editor, click on
the New button to add a 16-bit icon to the 32-bit icon.
The Icon Properties window will appear.
Choose the 16x16 (small icon) size and then click OK.
A new, empty 16-bit icon is displayed in the Icon Editing
Window.
You can easily switch back and forth between the 16-bit
icon and the 32-bit icon by clicking on the combo box
in the Icon Editing Window.
Installation of the resource file (.res)
with the 16-bit custom icon is the same as when installing
the resource file with the customized 32-bit icon:
- the resource file
- the resource file
from the project
- it back into the project
- the application
Conclusion
Custom icons help to differentiate your console-mode
applications at runtime and when they are picked from
Windows Explorer. Creating a custom icon is easy. When
you’re ready to distribute your executable, the
Borland C++ compiler incorporates the icon resource
into the executable so you don’t need to provide
any other files.
This
article was written by Curtis Krauskopf (email at  ). ). Curtis Krauskopf is a software
engineer and the president of The Database Managers (www.decompile.com).
He has been writing code professionally for over 25 years. His prior projects
include multiple web e-commerce applications, decompilers
for the DataFlex language, aircraft simulators, an automated Y2K conversion
program for over 3,000,000 compiled DataFlex programs, and inventory control projects.
Curtis has spoken at many domestic and international DataFlex developer conferences
and has been published in FlexLines Online, JavaPro
Magazine, C/C++
Users Journal and C++ Builder Developer's Journal.
Popular C++ topics at The Database Managers:
The Database Managers
helps companies to:- become more profitable
- grow their
business
- fix programs
that are behaving badly
- write new programs
to solve business problems
- do more with
fewer resources
Email them at
to find out how to make your company more successful.
|
|